Followers (I'd love to have you join)

Sunday, April 8, 2012

Gift Card Purse - My Creative Time Challange

Hi all.  Here is a little purse gift card holder I made for a Challange over at Emma's My Creative Time

Just want to share my latest scrap-lifted creation.  I was seeing these little purse gift sets and thought they were so cute.  I wanted to make one as a gift cardholder for the bigger gift cards.  Here is what I came up with.


The purse I studied before I made mine was one on Scrapalette’s Blog (here) .


For mine, I wailed images together in the circuit craft room using Forever Young  and Art Philosophy cricut carts.  I also used my cuttlebug  with a sizzix folder called stars and swirls—used it just on the flap.


This was pretty easy once I found out the size I need for the gift card.  The large gift card (I-tunes) measures approximately 5 ¼ by 3 ½, so I need to make my purse base half’s just a little bigger than that.  So the narrowest part of the purse base is 5  5/8  by 7 ½ plus the flap.  Total length of base with flap is 10 inches.  Outside cover is shorter (to leave an edge) at 9 inches.  Inside pocket piece is 8 by 4 1/2 .  The pocket piece is folded in half and scored 1 inch in on each end -- that is the part that is folded over and glued down. 

Other supplies – lavender chalk ink, glitter pen, small pieces of velcro set (for flap closure), purple ribbon, glue,  Emma’s My Creative Time stamp set (Polka-dotSurprise).  Imagine Vintage paper (music sheet for music cards!), and black /lavender colorcore card stock.


God Bless and Happy Scrappin’


Happy Easter -- Simple Gifts

Hello Friends. Family, and Followers,

I just wanted to share some quick Easter crafts with you. 


First, I made some supper easy candybar wrappers with the imagine and Nursery Tails.  I layered some patterns and images and added a monogram initial from A Child’s Year.  Since the Imagine and Cricut Craft Room (CCR) still don’t know how to cut and print a multilayered image without cutting all the layers into pieces, I only printed and then hand-cut the rectangle shape with my paper cutter.  Easy Peasy. 

Hey, did you notice -- Organic Chocolate?  We have been trying to eat healthy, fresh, natural, and organic – Who knew they could make chocolate even better for you --- Wooo Hooo!!


Next, I made some simple bunny Action Wobble head gift cardholders.  My kids are older, so I make a lot of gift cardholder these days.  Just used some stretched ovals, circles, ink, gem eyes, gamit glue, and ribbon – simple simple simple!  Then place I-tune cards inside and you’re done.


 Then I made the unhealthy stuff for the neighborhood kids.  Little Debbie brownie eggs with nerd feet turned in to cute little bunnies!  Stretched a tag from Art Philosophy cart for the carrot, added “Jesus Luvs U!“  -- my way to let them know it’s about Jesus.  The head shape is a folded shape from Art Philosophy again.


Simple Easter gifts – Hope you enjoyed my post.

God Bless and Happy Scrappin’!


Monday, April 2, 2012

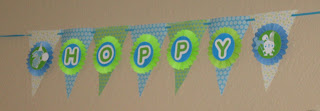
HOPPY BIRTHDAY EASTER BANNER


I love making banners.  So fun and easy, and I figured some things out by trial and error along the way.  Try it out and let me know what you think.  I’d love to hear comments if my info is helpful for you at all.

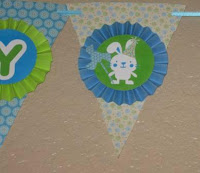
The first banner I made was for my son; his birthday is close to  Easter every so often so last year I made a banner that says “Hoppy Birthday” and is Easter teamed.  I printed all the patterned papers with my Imagine and cut most of the solids with regular card stock on my expression.  I used Nursery Tails for the patterns, Hello Kitty Font for the letters and bunny images from Nursery Tails and Create A Critter. I added a few balloons and party hats to the bunny’s (also from Create A Critter).

Now,  let’s talk about accordion medallions.  These look so cool I just had to try them out.
First, I scored an entire 12X12 sheet at ¼ intervals.  Then I cut them in to 1 ½ inch strips.  (This only took 3 sheets of blue card stock for 23 medallions at 8 per sheet). 
TIP 1:  Next time I would cut them at 2 inch per strip- it makes for a smaller center opening on the medallions that is much easier to work with when hot gluing them in position.  It only would have cost me one more piece of paper and a lot less frustration. 


Next, I folded them accordion style – easy-peasy.  I used glue dots to put the ends together – still easy.  The hard part was getting the accordion medallion to lay flat and stay stuck to the banner.  


TIP 2: in hindsight – USE a GLUE GUN.  That and wider strips would have been so much easier.  I was so frustrated with them I said I wouldn’t make them again, until I remembered my glue gun.  Also, you can see I strong this entire banner on one LONG ribbon – uhgg. 


TIP 3: Tie with individual ribbons between each pinafore, not one long one. 


Pinafores: I positioned the cut files two to a page (one up, one down) and used coordinating patterns from Nursery Tails Imagine cartridge to fill them in.  I stacked them all up and used my Crop-a-Dile to punch holes through the entire sack on the top two corners to run the ribbon through.

Hope you enjoyed my banner.  God Bless & Happy Scrapin'