Followers (I'd love to have you join)

Thursday, May 31, 2012

Decor and more than I asked for.....


Well, I have been so busy the last few weeks re-decorating.  Yes, my hubby finally let me get some new furniture and I had been saving for some new décor too!!!! 
Here is my  “before picture”.  It was all red and green plaid with lots of red glass décor.  It was prettier than it sounds, but over 10 years old and furniture was getting holes.  My table was almost 15 years old and had been through 2 rambunctious boys. 


HERE ARE SOME AFTER SHOTS


I forgot to take the cover off  after a CTMH gathering I had

Hubby got a new TV


Oops! I forgot to fix pillows all nice and neat before picture


It is all accented with minty sage and robin’s egg blue.

What do you think?    I love I the new soft, bright look! 


AND NOW FOR THE "MORE THAN I ASKED" FOR PART

Then, after all the re-decorating was finally done, you think we would set back and enjoy it --- Nooooo.  We stayed out in the woods for the long Memorial Day weekend. Why did I ever leave the comforts of my newly decorated home?  I came home with 10 big sore insect or spider bites in my shirt and bra area and a poison oak rash – woe is me – I have poison oak on my face!
God Bless & Happy Scrapin!


Monday, May 28, 2012

Teacher Thank You

This teacher’s gift was a fun one.  Yes, it is just a giftcard but the packaging was so cute and easy to make with my imagine.  The pattern, cow, and phrase are all from the Imagine More Cards cart.  I used Forever Young for the purse.  I fit the gift card on the card,  and used the same little cow as a accent on the card.  Put on a little ribbon and there you have it.


God Bless & Happy Scrapin'

Saturday, May 26, 2012

My Son Can Be an Enabler (when he wants to be)

My high-schooler needed a visual to do a book report.  He wanted to do a diorama with “real” looking characters – not the little kid looking ones on the paper dress-up cart.  He saw the Paper Doll Teen Seen   characters and thought they were perfect.  Only problem is,  I didn’t have that cart.  “Come on mom, this gives you an excuse to get another cart, please”.   Now keep in mind, this is the same kid that normally tells me I am wasting my money on all this crafting stuff.  He didn’t really have to twist my arm too much – after all, why do you think I showed him that cart in the first place?  I was just looking for an excuse to buy it.


Any whooo, I ordered the cart.  In the mean time, my son designed the diorama on paper told me what colors things need to be.  He sat down with me and picked out clothing for the characters, etc...  But I did get to get creative in putting images together to fit his vision.  I put the individual pieces together once they were cut and my son added everything to the box.  He was very happy with the way it turned out, and I have a nice new cart --  All is well.

I used the Cricut Craft Room with Paper Doll teen Seen (characters), Disney- Happily Ever After Cart (Castel), Animal Kingdom (horn), Paper doll Dress up (sword & scepter, 1st crown, cape, wizard hat), Life’s A Party (2nd crown from cupcake wrapper and 3-D chest) and Snapshots, Nature (sky background) I also used various imagine carts for patterns & colors as I cut all this with the Imagine using the Cricut Craft Room.

God Bless and Happy Scrapin’


Thursday, May 10, 2012

Crazy Birthday Cards

 I said in my last post we had a few birthdays.  Just wanted to share the cards I had made this past month.
The first card was an invite.  Here I am, self-proclaimed crafting artist and my son wants me to do some invitations for his party.  Woo Hoo! Oh but wait, he wants then “simple Mom, just make then plain”.  Are you serious?  This is what he had me do -- A true profit (card maker) is never appreciated in their own (home) town   Oh well at least  it was easy.  


These first 2 “real” cards were simple ones I peace-mailed on the imagine and cut as a base and then again with the sentiment circle pop-dotted.

This next strange looking thing is called a “Creeper”.  If your Kids play the game “Mind Craft” they will know what that is – weird, I know, but it went over well.


Here is a little gift bag and tag for a death wizard we know (Wizard 101). I used a heart, triangle, and belt (from Paper doll Dress Up) to make the hat.  I used the image and Cricut Craft Room to color and just print.  Then I  hand cut it out. This is my work around until there is a fix for this in CCR.


The last ones are my favorite – X-box controllers.  There was a controller on one of the carts but it didn’t look like x-box, so I welded various images together from the Art Philosophy cart and presto-change-o you have an authentic looking X-box controller.  I used some pop dots for the joysticks and some glaze on the buttons.  Really like how they came out.

Of course I used  some of Emma’s My Creative Ttime Stamp for the inside.
Hope you enjoyed my crazy cards.
God Bless and Happy Scrapin’

Wednesday, May 9, 2012

Two chances to win a CRICUT EXPREXTION 2!


Here I am working on Mother's Day Flowerpot Cards
This is a post to place a photo on my blog so I can re-post for a chance to win on another blog.  Go over to the Cricut Blog and check it out.  You have until midnight on Friday May 11th to post a picture of yourself at your scrap space on that blog, for a chance to win. 


Then over on Bella Blvd's blog you have another chance to win an Exprestionn 2 with a bunch of carts. Just leave a comment on her blog for 5 May (National Scrapbooking Day) for your chance to win.

Good luck all!

God bless and Happy Scrapin'


Mother’s Day Flower Pot Cards

Sorry I have been absent for a month.  I have been over-the- top busy.  Our Kitchen flooded thee weeks ago.  We had to dry it out and replace all the floorboards, caulk, paint etc..,  We also had a few birthday parties last month,  and two involved end-of-year school projects.  I have busy trying to completely redecorate my Living room and Kitchen --- yes, it flooded on some new pieces, but they did not get destroyed.  Then, I was in charge of the neighborhood garage sale.  The sale took place on the weekend of National Scrapbook day, so I didn’t get to scrap, but….  I did break away from my own sale for a quick jog to the next street.  One of my customers said, “Hey, they have scrapbooking stuff at another sale”.  I literally jogged down the street, around the corner and up the next street to get there.  Score!  Seventeen pounds of paper and cardstock, for $3!  Also, a few CTMH stamps and stamp blocks, ink, chalk, and a few more odds and ends.  The paper was $3 but the rest of the stuff was $14.  I’m a happy camper.  So my National Scrapbook Day was not completely void of scrapping – I sorted paper on the floor of my garage for two hours, while my sale was still going --- come-on, I was so excited!  

I also used my garage sale to see if I had any neighbors who like to paper craft.  I took the plunge and became a consultant for Close to my Heart.  Yes, you can buy from me on-line (upper left corner); but what I really want to do is have crops, workshops, and classes in my home.  I absolutely love the Art Philosophy Cricut cartridge and I think that was the biggest selling point for me.  And, I have been a stay-at-home-mom for 15 years.  Don’t get me wrong, I love that “job”, but I am in need of a little self-steam.  Hence, I take on a home based business.  Please wish me luck; my husband gave me that, “you’re crazy, this won’t last” look.


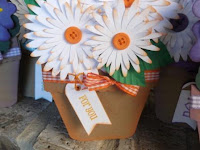
Well, on to my most recent project – Mother’s Day Card Flowerpots.  I have seen these all over the Internet and boards as of late, and thought they would be perfect for mother’s day cards.

 I usually do most of my designs on paper first.  Then I go into the Cricut Craft Room or Design Studio and find what I have that can be manipulated to make my project.

The flowerpot itself is the cupcake image on AP with a welded rectangle and scallop added. Copy the welded flowerpot and flip the copy and weld the two bottoms together.  

I actually used the Art Philosophy cart to most of the pieces on them.  I did use Walk in my Garden for the leaves on the violets, however.  
  I hand cut the
tags for the front and the inside and added a little stand in the back (also cut by hand).


Supplies:    I used some of My Creative Time stamps and a few others as well as, ribbon, floss, buttons, puffy paint (yellow centers), eyelets, and tape.  Cricut Craft Room (it’s free), Art Philosophy cart and Walk in My Garden Cart.

This was really super easy project and I love how they turned out.  I used my computer to type the “Happy Mother’s Day” inside. 


God Bless and Happy Scrapin’

I think they look so cheery!